Camera grip from the 3D printer
For sports and close-up shots from low angles, a camera grip is a very useful tool, as it allows you to hold the camera securely and steadily. With a little practice, you can achieve very stable shots, comparable to a gimbal, but much cheaper and with lighter and more compact equipment.
Background
Since my youth, when I skateboarded and later rode a scooter, I've wanted a camera (like the pros) with a fisheye lens and a grip so I could hold it from above and capture spectacular shots. Unfortunately, back then these were only available on high-end cameras at a very high price, which I couldn't afford (and didn't want to). As I was designing the first parts for the 3D printer myself, I asked myself whether a 3D-printed handle would be stable enough. A short time later, the first carbon fiber-reinforced PETG was on the market, and I thought to myself, of course, if it's possible, then it absolutely has to work with this material, and the effort to develop the handle will be worthwhile. My goal was to design a very lightweight and ergonomically perfect handle. It should be mounted via the camera's hot shoe, making it extremely light and compact. How do I create an ergonomic handle? The first question I asked myself before I could even start designing was: What does an ergonomic camera handle actually look like? At first, I was unsure how to approach this, but later I remembered watching American Chopper (a TV show about custom choppers, from which I learned a lot about manufacturing and which has always inspired me to build things myself) and seeing how a hand shifter grip was made. They marked the thickness of the fingers and their placement when holding the handlebar on a piece of metal. Now I wanted to try it myself, so I picked up a handlebar that felt comfortable and saw how I would grip it if it were attached to the camera. Then I traced the fingers and started transferring them into CAD. Originally, I wanted to reproduce the fingers exactly, but unfortunately, I didn't yet know how to do that in CAD. After much deliberation, I decided to keep at least the first version simple, because I was becoming increasingly unsure whether I would always hold the camera that way. If I held the camera differently even once, and too much was predetermined, it might be uncomfortable.
The First Print
When I think back to that time, when I printed the handle, which was still very early on, it was already a very large print that took several hours. And yes, back then it took a few tries to get the print to turn out well, because there were no PEI-coated print beds yet, only the PEI sheets from electronics, and these worked better sometimes than others, depending on how dry the filament was. At the time, everyone said that the humidity level didn't make a difference, since the filament isn't hygroscopic, especially with ABS. But I've noticed that the performance of the 3D printer depends heavily on the time of year and the resulting humidity. I've summarized my experience with wet filament in this article: Problems with wet filament?! FDM printing.
Furthermore, I decided to sacrifice the handle to see how stable it really is. To my surprise, the handle was significantly sturdier than expected.
Creating a handle proved a bit more difficult than initially anticipated, but even with the first print, I was impressed by how well the handle fit in my hand, even though it turned out a little too long. With the second print, I was very happy with the design and immediately tested it with the camera. Using a 1/4 UNC screw, which can be purchased as camera equipment, I attached the
First Use
When my good friend Alex asked me if I'd like to film the Scale Adventure, I knew that with the handle, I now had the perfect setup for filming the model cars. Using a wide-angle lens attachment, I got some great shots of the cars. More about the event can be found in the article Globe Trotter Rodeo - Scale Adventure 2019
Unfortunately, it turned out that the camera mount was insufficiently secured against twisting, and the 3 mm set screw simply couldn't be tightened enough to hold the camera securely.
Optimizing the Mount
I deliberately decided against flattening the 1/4" threaded screw, as I know from experience that this would damage the threads in the plastic. Originally, I wanted to make the handle as small as possible, mainly for weight reasons, I thought, although honestly, that doesn't make a huge difference. But mainly because I didn't have a reliable printer at the start of the project, and that's changed now, so why stick to an outdated requirement?! So I started thinking about how I could connect the handle to the camera with the best possible form fit and began measuring. Yes, there's exactly one way to connect the camera to the hot shoe with a form fit, and that's when a square edge fits the shape of the camera's hot shoe. However, the edge is only a few sheets of paper high. Is that enough? As a mechanical engineer, I would say no, that's too risky for me, but as a tinkerer, I'll give it a try and can say with certainty, YES, it works!
Update 11/01/2025
Unfortunately, I never managed to tighten the screw enough to use the camera securely. I've since bought an aluminum grip that cost less than €50 and is made of aluminum with a rubber coating, but I still want to finish the project to my satisfaction. The knowledge I've gained can help me with my next project, and it's simply fun to make something better than what you can buy. My 3D-printed grip is just more comfortable than any commercially available grip I've ever used.
The plan now is to use a hot shoe mount that is form-fitting to the grip and therefore can't twist.
Kaufoption
| Beschreibung | Referrallinks |
|---|---|
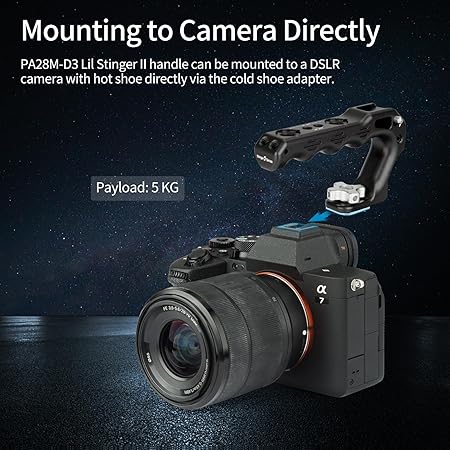 Nitze Cold Shoe Top Handle Mittlerweile kann man um etwas 30€ einen sehr ähnlichen Griff als ich entwickelt habe bei Amazon kaufen Würde ich dennoch dieses Projekt wieder machen? JA klar, denn ich habe sehr viel dabei gelernt und ein Griff der genau für meine Hand gefertigt wurde passt einfach am besten. Ein weiterer Vorteil ist, dass der 3D gedruckte doch etwas leichter als der gekaufte ist. |
mazon DE |
Verwendetes Equipment


In Projekten eingesetzt